Showing posts with label DIY Projects. Show all posts

Thursday, March 24, 2011

Leather Lanyard

I'm certain you can purchase all of these items at your local craft store.

First, cut your leather to desired width & length. 

Loop it through the lobster clasp.

Bring the bottom of your leather strap to the top.

Using your leather punch, puncture through all three layers of leather.

Place your crystal rivet through all three holes.

Place the back of the rivet.

 Attach the back of the rivet using the rivet setter.

Secure in place with a hammer.

Add your own personal touch with any sort of charm.  There are a million cool things out there!

  Another leather project...
 I have more great leather ideas in mind... Can't wait to share them with you!  Just remember to check back often;) 

Have fun creating your own.
The possibility's are endless... cell phone lanyard perhaps?!

Turn "can do" into "can did!"

Fuchsia


Find another leather idea here.

Linking to:
debbiedoos

Tuesday, March 22, 2011

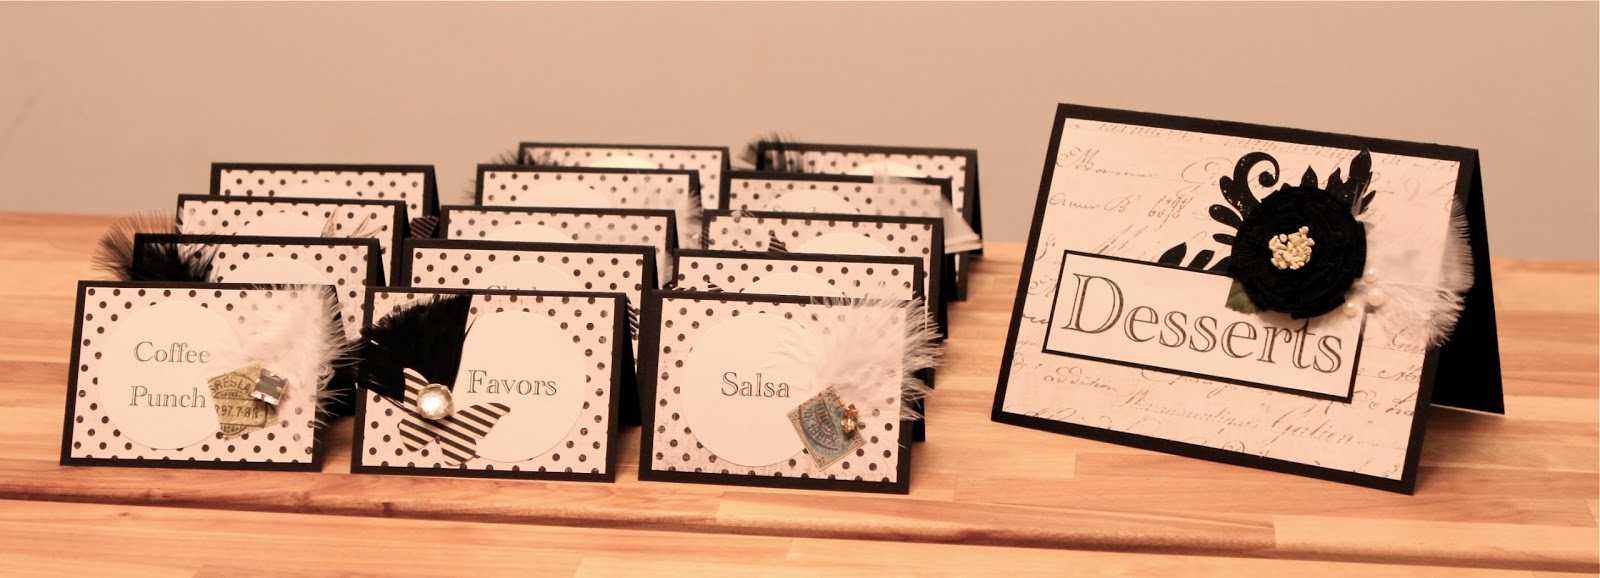
Vintage Themed Food Labels

I made these food labels for a vintage themed party.  They are a great way to add little details to any celebration!  I printed the names of each menu item on my computer, printed them on 8.5 x 11 in. cardstock, and cut them out with a circle punch.  The cards were cut from black cardstock and scored so they would have a clean fold.  All of the paper and most of the embellishments were purchased at my local craft store.  Finished size of food labels is 2.5 x 3.5 in.  Larger size is 5 x 7 in.

This is how I packaged them for shipping.  I made the the sticker by cutting polkadot paper with my circle punch, and running it through my Xyron 250.  I have several different sizes of these sticker makers and use them with almost every scrapbooking project!
Try this idea for your next party!

-Chartreuse-

Wednesday, March 16, 2011

DIY Pomander

Here is a quick and easy way to make any room more festive for a holiday!

You will need:
Styrofoam ball
Ribbon
Large pins
Paper flowers with petals

There are several ways to make the paper flowers.  I used my Cri-cut machine.  You can also use any other die-cut machine or a flower-shaped paper-punch.  Gently push the petals of the flower up as shown in photo above...

and push a pin through the center of the flower.

Push the pinned flower into the Styrofoam ball, alternating colors.

Attach the ribbon to the ball with a pin and it is ready to be hung!

And there you have it!  A great way to make any celebration a little more colorful!
-Fuchsia- 


Monday, March 7, 2011

Framing A Puzzle

So you ask... 'What should I do with this cool looking puzzle?'.  (Wanting to cherish the memories of putting it all together & not wanting to ruin the beautiful masterpiece.)   In this tutorial, I will show you how to mat your own puzzle...  Are you up for challenge? If so, I have confidence in you!... I believe you will be pleasantly surprised with the outcome!

You will need:
Your puzzle
Puzzle glue
Mat
Frame
Mat cutter
Straight edge
X-Acto knife
Cutting board
Artist's tape

This is an essential tool to getting a great looking cut on your mat.  The mat cutter shown here is no longer available, but you can purchase a similar one {here}.

Always work on the backside of your mat,  for you will be marking it a lot.

Cut outer perimeter of mat using dimensions of frame.  Be sure it has a snug fit...you do not want it to buckle at all.

It is now time to cut the opening where you will put your puzzle.  Still working on the backside of the mat, center your puzzle on the mat to determine the size of the opening.  Keep in mind that your opening needs to be smaller than your puzzle.
  Using your straight-edge tool and mat cutter, cut the inner opening to your desired size.  
*Important*- Make sure your mat cutting tool is facing the outer edge of the mat, so the bevelled edge will be cut at the correct angle. 

Place your puzzle face-side down and center over mat opening.  Secure in place with artists tape.

I was quoted $216 to have my puzzle framed at a frame shop... I saved $140 by doing it myself!
I hope this wasn't too "puzzling" for you... Good luck! ;)

-Fuchsia-

Saturday, February 12, 2011

Camera Strap Tutorial

 
After seeing so many gorgeous camera straps out there, I decided that my boring black DSLR camera strap just had to have one!  


Gray and white stripe fabric- Moda
Rhinestone yardage, iron-on stabilizer and burlap- Walmart
Stretch tulle- JoAnn Fabrics
Pleated satin ribbon, buttons, red toweling fabric- unknown source


I measured the portion of the camera strap that I wanted covered and added a half inch to to all sides for seam allowance.  After cutting two strips of striped fabric (the front and the back of strap), I ironed the stabilizer onto the back of one piece.  I knew I would be adding a lot of embellishments, and I wanted to make sure they had something sturdy enough to hold their weight.  I then sewed the pleated ribbon down the center of the piece with the stabilizer.


Placing right sides together, I sewed down the length of one of the sides, folded the short ends
to the stabilizer side and sewed the length of each.  I placed the right sides together again and sewed the other long side together.

After turning the camera strap right side out, I ironed it flat.  It is now ready to be embellished.                  

I cut a 1 inch by 24 inch strip of the stretch tulle and sewed a gathering stitch down the center lengthwise.

I gathered the strip of tulle into a ruffle.


I attached the rhinestones to the ruffle by hand stitching around each link.


I started the fabric flower by cutting a 2 inch by 18 inch strip of the red fabric, and folding it in half lengthwise.  Fold the corner down on one end and stitch it to the center of a 3 inch by 3 inch square piece of felt.


To create the flower, fold the fabric over at an angle, working your way around in a circle.  Stitch each fold through the felt backing to the front, and to the back again.


When there is about 2 inches of fabric left, trim the excess felt off of the back, being careful not to cut your stitches.  Then fold one last petal and stitch the end of the fabric to the back of the flower.


The small burlap pieces were hot glued so they would hold their shape and be less likely to fray.


I hand sewed each piece onto the camera strap using needle and thread, then used a hot glue gun to secure any loose pieces.  

And there you have it!  We'd love to hear your feedback.  If you like this post, consider following us (sidebar on the right)... We have many more great ideas coming soon!

-Chartreuse-


Monday, February 7, 2011

Personalize Your Favorites

 Begin personalizing your favorites.
 What you'll need: 
Leather remnants
Leather hole punch
Scissors
Hammer
Rhinestone Rivets
                                                                               Rivet Setter                                                                                    


Cut leather to desired width and length with scissors.  Fold the leather in half and w/ your hole punch, puncture the leather with smallest hole setting.


Puncture hole through whatever it is you're trying to personalize.  Try to get it as straight as you can.


Put the rhinestone rivet through all 3 holes.


Secure rhinestone rivet with hammer.


Yelling for my daughter to come and give me her head so I could use it in the final picture, she happily skipped over.  I popped the hat on and said, "Stay still."  (Am I sounding mean?)  I'm really not---I promise.  She happily obliged and I snapped the final picture.  I was so excited, it had appeared on the camera display that I had taken a pretty cool looking picture... until I uploaded the photos...

I discovered I had photographed the eye that has half the typical eyelashes!  Yes, look real close.
I thought, "Oh gracious---I cannot use this picture, how silly would that be!"  So I proceeded to take many more pictures...to no avail.  Actually, I ended up with lots of cool pictures but wanted to use this one to make it a little more interesting.  Te hehe;)

To make a long story short, T was involved in a cheerleading incident, which included a falling body where a sneaker skidded across her face... and bye bye eyelashes.

Just so you know both girls are okay.  :)


More leather ideas coming soon!


Would love to hear your thoughts!


-Fuchsia-